Integrate Document Composition Into Your System

If you're building a CRM, customer portal, or line-of-business application, you've likely encountered the challenge of getting documents signed. The traditional approach—exporting PDFs, emailing them, and tracking signatures manually—creates friction for both your team and your customers.
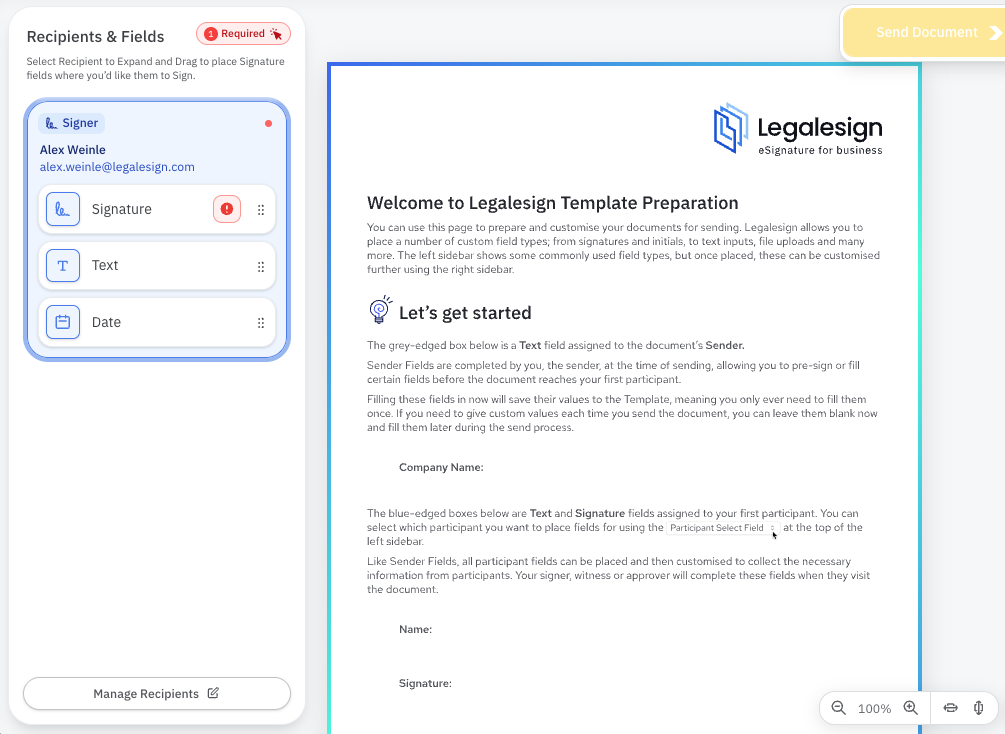
The Legalesign Document Viewer's compose mode solves this by embedding document preparation directly into your application. Your users can add signature fields to pre-generated documents without leaving your system.
Why Use Compose Mode?
Compose mode is designed for scenarios where:
- Recipients are already known: Your application has already collected customer information
- Documents are pre-generated: You've created the PDF from your own system (contracts, invoices, agreements)
- Speed matters: Users need to quickly add signature fields and send, not build reusable templates
- Simplicity is key: You want a streamlined interface without template management complexity
Unlike editor mode (which creates reusable templates with roles), compose mode is optimized for one-time document preparation with specific recipients.
How It Works
The workflow is straightforward:
- Your application generates a PDF document
- You upload it to Legalesign via the API to create a template
- You embed the Document Viewer in compose mode with recipient details
- Your user adds signature fields for each recipient
- The document is sent for signing
If you look at the new QuickSend feature in Legalesign Console you'll be able to
see how this recipient-first approach works in practice!
Basic Integration
Step 1: Install the Component
For vanilla JavaScript projects:
npm install legalesign-document-viewer
For React projects:
npm install legalesign-document-viewer-react
Step 2: Get an Authentication Token
You'll need an authentication token to authenticate API requests. See our Authentication Guide for implementation details.
Important: Generate tokens server-side to protect your credentials. Never expose API keys in client-side code.
Step 3: Create a Template from Your PDF
Before using the viewer, upload your PDF to create a template. There's two ways to handle this: you can use API calls to generate a template for the user from a document (or clone an existing one) or you can have one ready in the Console application (easy for developers trying out the component).
Here's an example of how to generate a template with code but if you're just interested in demoing the DocumentViewer then
feel free to pass it a pre-generated template id.
This is a GraphQL example, but you can equally create a template using the REST API - one important note if you are using the REST API
is that ids need to be appended with a type code and converted to base64 for UI widgets and the GraphQL API. So btoa('tpl'+templateId) (or your language equivalent)
for templates where 'tpl' is the prefix for all template ids.
In this example your token can be generated by javascript or NodeJS code similar to NodeJS Authentication example. You can explore other GraphQL tools or the ones suggested in our GraphQL Libraries suggestions.
const response = await fetch('https://graphql.uk.legalesign.com/graphql', {
  method: 'POST',
  headers: {
    'Authorization': `Bearer ${token}`,
    'Content-Type': 'application/json'
  },
  body: JSON.stringify({
    query: `
      mutation CreateTemplate {
        createTemplate(input: {
          groupId: "${groupId}"
          title: "${documentTitle}"
        })
      }
    `
  })
});

const { data } = await response.json();
const templateId = data.createTemplate;
Then upload the PDF file to the designated S3 bucket using the template ID. See Uploading Files.
Step 4: Embed the Viewer in Compose Mode
React Example
import { LsDocumentViewer } from 'legalesign-document-viewer-react';

function DocumentComposer({ templateId, token, recipients }) {
  const handleSend = () => {
    // Call your API to send the document
    console.log('Sending document...');
  };

  return (
    <LsDocumentViewer
      templateid={templateId}
      token={token}
      mode="compose"
      recipients={JSON.stringify(recipients)}
      filtertoolbox="signature|initials|date"
      onUpdate={(event) => {
        console.log('Template updated:', event.detail);
      }}
    >
      <span slot="left-button">
        <button onClick={() => window.history.back()}>Cancel</button>
      </span>
      <span slot="right-button">
        <button onClick={handleSend}>Send Document</button>
      </span>
    </LsDocumentViewer>
  );
}
Vanilla JavaScript Example
<!DOCTYPE html>
<html>
  <head>
    <link rel="stylesheet" href="https://unpkg.com/legalesign-document-viewer/ls-document-viewer.css" />
    <script type="module" src="https://unpkg.com/legalesign-document-viewer"></script>
  </head>
  <body>
    <ls-document-viewer
      id="composer"
      templateid="YOUR_TEMPLATE_ID (looks a bit like dHBsYjQYTg5NWQtYWRhMy0xMWYwLWIxZGMtMDY5NzZlZmU0MzIx)"
      token="YOUR_TOKEN_HERE"
      mode="compose"
      recipients='[
        {"email": "john@example.com", "firstname": "John", "lastname": "Doe", "signerIndex": 1},
        {"email": "jane@example.com", "firstname": "Jane", "lastname": "Smith", "signerIndex": 2}
      ]'
      filtertoolbox="signature|initials|date"
    >
      <span slot="left-button">
        <button onclick="handleCancel()">Cancel</button>
      </span>
      <span slot="right-button">
        <button onclick="handleSend()">Send</button>
      </span>
    </ls-document-viewer>

    <script>
      const viewer = document.getElementById('composer');

      viewer.addEventListener('validate', (event) => {
        const sendButton = document.querySelector('[slot="right-button"] button');
        sendButton.disabled = !event.detail.valid;
      });

      function handleSend() {
        // Call our API to send the document
      }
    </script>
  </body>
</html>
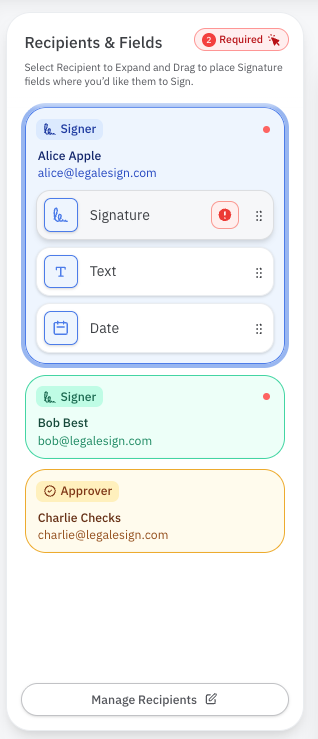
Key Features of Compose Mode
Pre-defined Recipients
Pass recipient information directly to the component:
const recipients = [
  {
    email: "customer@example.com",
    firstname: "Sarah",
    lastname: "Johnson",
    signerIndex: 1
  },
  {
    email: "witness@example.com",
    firstname: "Mike",
    lastname: "Williams",
    signerIndex: 101,
    roleType: "WITNESS"
  },
   {
    email: "charlie@example.com",
    firstname: "Charlie",
    lastname: "Chaplin",
    signerIndex: 2,
    roleType: "APPROVER"
  }
];
Note that witnesses require a roleType and a special signerIndex to be allocated to them. You
can create an approver just by giving it the correct roleType (no special signerIndex required).
The component automatically:
- Creates color-coded fields for each recipient
- Hides the sender from the participant dropdown
- Removes sender-specific fields from the toolbox
Filtered Toolbox
Restrict which field types users can add:
filtertoolbox="signature|initials|date|text"
This is useful when you want to limit complexity or enforce business rules about what information can be collected.
Custom Action Buttons
Use slots to integrate with your application's navigation:
<LsDocumentViewer ...>
  <span slot="left-button">
    <button onClick={() => navigate('/dashboard')}>Back to Dashboard</button>
  </span>
  <span slot="right-button">
    <button onClick={handleSend}>Send for Signature</button>
  </span>
</LsDocumentViewer>
Event Handling
Track user actions and template validity:
viewer.addEventListener('update', (event) => {
  // Template was modified
  console.log('Changes:', event.detail);
});

viewer.addEventListener('validate', (event) => {
  // Enable/disable send button based on validity
  if (event.detail.valid) {
    enableSendButton();
  } else {
    disableSendButton();
  }
});
Best Practices
Security
- Never expose credentials: Generate tokens server-side
- Use short-lived tokens: Implement token refresh logic
- Validate recipients: Ensure email addresses are verified before sending
User Experience
- Show validation feedback: Use the
validateevent to enable/disable send buttons - Provide clear instructions: Add help text explaining how to add fields
- Handle errors gracefully: Catch API errors and show user-friendly messages
Performance
- Pre-generate templates: Create templates before showing the viewer to avoid loading delays
- Cache tokens: Reuse authentication tokens within their validity period
- Optimize PDF size: Compress PDFs before upload for faster loading
Browser Support
The Document Viewer works in all modern browsers:
- Chrome/Edge (latest)
- Firefox (latest)
- Safari (latest)
- Mobile browsers (iOS Safari, Chrome Mobile)
Next Steps
- Explore the complete API documentation
- Review OAuth2 authentication setup
- Check out the NPM package
- Contact support for integration assistance
By embedding document composition directly into your application, you eliminate context switching, reduce errors, and create a seamless signing experience for your users.